What are Git hooks and how can they help your development workflow
The motivation
Imagine you have a team of great software engineers with different levels of expertise. Each person has his or her preferred way of writing and committing code.
Alice joined the team recently and needed to remove a certain line of code. She checked the commit message for that and found:
Fixed the bug
There was no ticket number, no further info, no explanation or any reference. The author of that line has left the company so it’s not possible to follow up with him.
She removed that line and ran some local tests successfully. She thought “the bug” was obviously fixed in some other way.
After the next release, “the bug” reappeared again. It was documented in a previous ticket that everyone forgot. Analyzing that piece of code would have been much easier when reading the ticket but since nobody linked the ticket to the code, it was impossible to find it in the sea of tickets.
Improvement idea 💡: Add a ticket number to every commit message!
I know that not everyone writes useful tickets, but that problem needs a different post. Instead, let’s focus on enforcing a ticket number in every commit message.
Now Alice, having had that bitter experience, documents every single bug she has on a ticket and makes sure every commit has a ticket reference to make it easier to understand the reasoning behind the solution.
Bob has just joined the team and he keeps forgetting the ticket number on the commit message. Alice keeps reminding him of that. He thinks she’s not focusing on the essential work in his pull requests. She thinks he is not following “the convention” the team agreed on. As you can imagine, the team is frustrated over a simple problem that has a solution.

Image source: https://www.gomodus.com/blog/b2b-sales-leads
It’s time to automate repetitive boring tasks and introduce Git hooks!

Image source: https://github.com/butschster/LaravelGitHooks
What are Git hooks?
Git hooks are scripts that Git executes before or after events such as commit, push, and receive.
They are a great way to improve developers’ time and collaboration by automatically checking things like grammar, length and style of commit messages before a commit. They are also a way to automatically check whether certain tests were successful such as test suits and coverage checks or to automatically push code to stage or production.
Git hooks are available in the standard Git installation, so you can use them right away once you initialize your folder with git init.
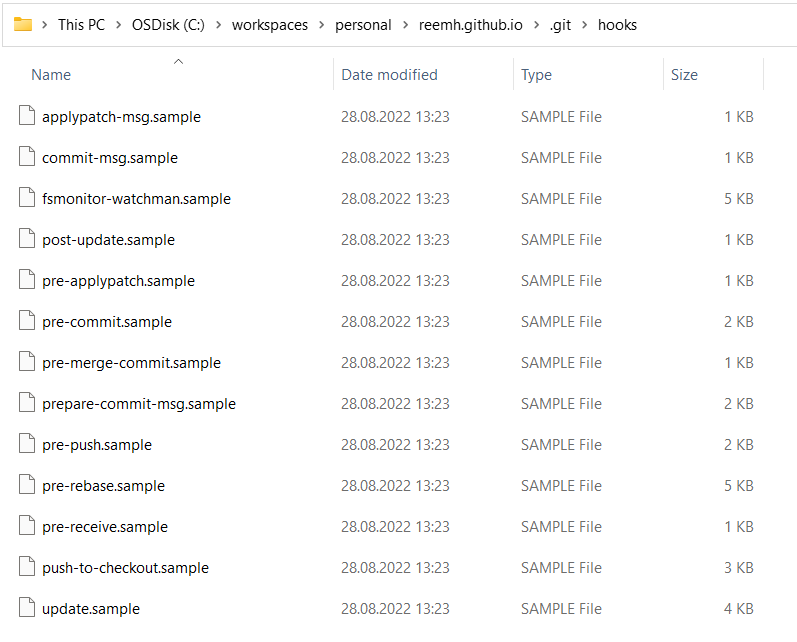
The Git hooks are located in the .git/hooks subfolder, which comes with a list of samples written as shell scripts. They are very simple to follow and use.

The default Git hooks available in any repository
Types of hooks
There are two groups of Git hooks: client-side and server-side.
Client-side hooks are triggered by operations such as staging, committing and merging, while server-side hooks run on network operations such as receiving pushed commits. You can use these hooks for all sorts of use cases.
- Client-side examples:
- pre-commit: Check the commit message for spelling errors.
- post-commit: Email/SMS team members of a new commit.
- Server-side examples:
- pre-receive: Enforce project coding standards.
- post-receive: Push the code to production.
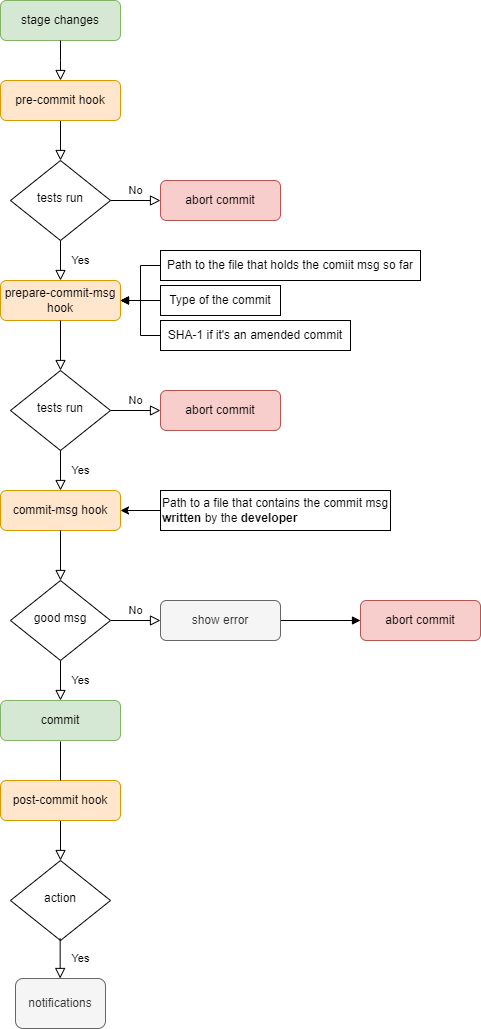
Let’s take a deeper look into the client-side hooks as in the figure below.
- When some code is staged, a
pre-commithook is executed. This is mostly useful to check some tests are running successfully. If the check fails, no commit will be possible before fixing that. - A
prepare-commit-msghook is run with the three arguments shown in the figure. This hook is useful if you have automatically generated commits. - The next one is the
commit-msghook, which is the most commonly used one. This hook can check the commit message written by a developer. - Once all those hooks are successful, a commit is successful.
- Finally, a
post-commit-hookis executed, which can be useful to send notifications.

A git workflow with the possible client-side hooks
Getting started with Git hooks
For simplicity, I’ll just present two examples that I’ve worked with closely:
- Modify
commit-msghook to enforce a check for a ticket number in the commit message. - Use existing tools to apply conventional commits in a Node.js project.
1. Simple commit message check
Follow the next steps to activate your first Git hook:
- Duplicate the
commit-msg.samplefile inyour-repo/.git/hooksand rename it tocommit-msgwith no file extension. - Give it execution permission using
chmod +x .git/hooks/commit-msg. - Modify the file with the code you need (see examples below).
- Save your changes and you are ready to go! It will be picked up automatically by git the next time you commit something.
Here is the commit-msg.sample code before modifications. It checks the duplicate signed-off-by (SOB) author lines in the commit message:
#!/bin/sh
#
# An example hook script to check the commit log message.
# Called by "git commit" with one argument, the name of the file
# that has the commit message.  The hook should exit with non-zero
# status after issuing an appropriate message if it wants to stop the
# commit.  The hook is allowed to edit the commit message file.
#
# To enable this hook, rename this file to "commit-msg".

# Uncomment the below to add a Signed-off-by line to the message.
# Doing this in a hook is a bad idea in general, but the prepare-commit-msg
# hook is more suited to it.
#
# SOB=$(git var GIT_AUTHOR_IDENT | sed -n 's/^\(.*>\).*$/Signed-off-by: \1/p')
# grep -qs "^$SOB" "$1" || echo "$SOB" >> "$1"

# This example catches duplicate Signed-off-by lines.

test "" = "$(grep '^Signed-off-by: ' "$1" |
	 sort | uniq -c | sed -e '/^[ 	]*1[ 	]/d')" || {
	echo >&2 Duplicate Signed-off-by lines.
	exit 1
}
Now, let’s modify this hook to enforce having a reference ticket number in the commit message like this:
#!/usr/bin/env ruby
# Get the file that contains the commit message
message_file = ARGV[0]
# Get the commit message
message = File.read(message_file)

# Regular expression to find the ticket number e.g. [ref: #123]
$regex = /\[ref: #(\d+)\]/

# If no match is found, print an error and reject the commit
if !$regex.match(message)
  puts "[COMMIT-MSG] Your message is not formatted correctly"
  exit 1
end
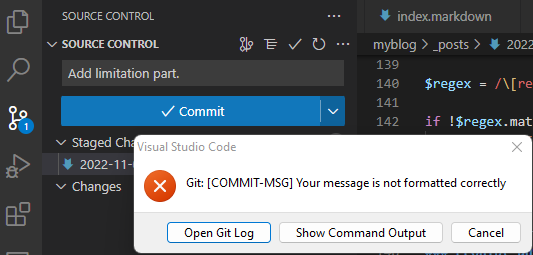
After saving the file you will get the following error when your commit message doesn’t contain the [ref: #<number>] pattern:

An error when using a bad commit message
And here’s a successful commit message that passed the hook:

A successful commit message
Tip ℹ️: If you want to ignore Git hooks, add the --no-verify argument to your git command. However, this only applies to client-side hooks and should only be used when absolutely necessary.
The limitations of plain Git hooks
Distributing the Git hooks to every developer is a typical problem because the hooks are located in the .git hidden folder which is usually not pushed to the remote repository. It will also get quickly challenging to handle all the regular expressions and adhere to some commits conventions.
2. Apply conventional commits in a Node.js project
To overcome the limitations of the simple process above, I’ll demonstrate how we are using git hooks in a Node.js project to check commit messages style.
Conventional Commits
A conventional commit is a specification for adding human and machine-readable meaning to commit messages. It makes it easier to write a set of automated tools on top of that such as:
- Automatically generating CHANGELOGs.
- Automatically determining a semantic version bump (based on the types of commits landed).
- Triggering build and publish processes.
The structure of conventional commits messages looks like this:
<type>[optional scope]: <description>
[optional body]
[optional footer(s)]
So the example we’ve seen in the screenshots before can become something like this (an optional body was added here for demonstration)
feat(blog): Add limitation part.
Write the paragraph that explains the limitations of Git hooks.
[ref: #1]
There are already a couple of tools that help check that the commit message has that pattern as demonstrated by commitlint in the next section.
Commitlint
commitlint is an awesome package that helps you get commit messages with high quality and provides short feedback cycles by linting commit messages right when they are authored.
It is very easy to use by just installing commitlint as a devDependencies in your project and defining the configurations you need in a commitlint.config.js file in the root of your repository.
This is so straightforward in comparison to what we were trying to do with the plain Git hooks and parsing the params before.
To use commitlint to have a commit message with the following structure
type(scope?): subject
body?
footer?
We can use the simplest example commitlint.config.js file that extends the default conventions:
module.exports = {
    extends: [
        "@commitlint/config-conventional"
    ],
}
We can extend commitlint.config.js by extending @commitlint/config-conventional with custom rules that fits our workflow.
The following example enforces commit length and style and checks a ticket number by just extending the configuration object.
/**
 * List of possible commit scopes based on the folders
 * which is a good practice in a monorepo
 */
const scopes = [
  'workspace',
  'tooling',
  ...getFolders('./packages'),
];

const configuration = {
  /**
   * Extend the default config-conventional
   */
  extends: ['@commitlint/config-conventional'],

  /**
   * The parser preset used to parse commit messages
   * Always look for a prefix such as `ABC-` or `#`
   */
  parserPreset: {
    parserOpts: {
      issuePrefixes: ['ABC-', '#'],
    },
  },
  /**
   * Commitlint can output the issues encountered in different formats
   */
  formatter: '@commitlint/format',
  /**
   * Any rules defined here will override rules from @commitlint/config-conventional
   * So we only define the extra rules that we want on top of conventinal commits
   * The format is [level, applicable, value]
   * - The levels are 0 for disabled, 1 for warning, 2 for error
   * - Applicable can be `always` or `never` to invert the rule
   * - The value used for the rule
   */
  rules: {
    // check the issuePrefixes defined in ParserOpts
    'references-empty': [2, 'never'],
    'body-leading-blank': [1, 'always'],
    'footer-leading-blank': [1, 'always'],
    // Always use a scope written in a lower case from the list of defined scopes
    'scope-case': [2, 'always', 'lower-case'],
    'scope-empty': [2, 'never'],
    'scope-enum': [2, 'always', scopes],
    // Start your commit subject with a capital letter and end with a full stop
    'subject-case': [
      1,
      'always',
      ['sentence-case', 'start-case', 'pascal-case', 'upper-case'],
    ],
    'subject-empty': [2, 'never'],
    'subject-full-stop': [1, 'always', '.'],
    // Always use a type written in lower case from the list of types
    'type-case': [2, 'always', 'lower-case'],
    'type-empty': [2, 'never'],
    'type-enum': [2, 'always', ['feat', 'fix', 'docs', 'style', 'refactor', 'test', 'revert', 'release']],
  }
};

module.exports = configuration;
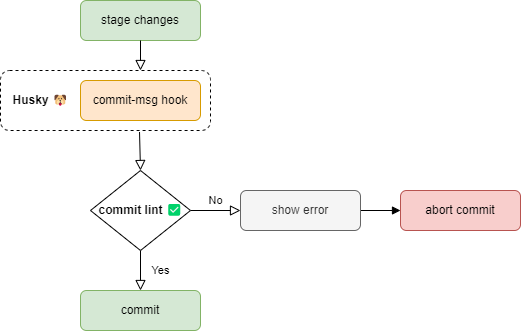
To get commitlint to be integrated in the workflow, we need to run it as part of Git hooks. For that we will be setting up Husky to configure the hooks to run commitlint as explained in the next sections.
Husky
Husky is an npm package that improves commit messages and the management of the hooks in a Node.js project. It solves the issue of the hidden .git/hooks by “installing” the Git hooks from source code files located in the repository.
It is a great option that scales and helps you define everything only once in one place for all.
Husky works within the package.json file by including an object that configures Husky to run certain scripts, and then Husky manages the script at specific points in the Git lifecycle.
To get it working, you need to install husky as a devDependencies in your project.
Afterward, run a command that will allow Git hooks to be enabled:
npx husky install
At last, you might want to adjust the package.json file to add the following. This script runs when git dependencies are being installed:
{
  "scripts": {
    "prepare": "husky install"
  }
}
Checking commit messages with Commitlint and Husky

Commitlint can be configured to run as a husky pre-commit hook for local settings. To do that you just need to run the following command once for the setup to happen:
npx husky add .husky/commit-msg 'npx commitlint --edit $1'
Test the hooks
To test the last commit in your branch you can do
npx commitlint --from HEAD~1 --to HEAD --verbose
It’s also possible to test any message with commitlint configurations using the command
echo "your commit message" | commitlint
An example errorenous message will be:
⧗   input: fix(tooling): Fix broken doc generation.
✖   references may not be empty [references-empty]

✖   found 1 problems, 0 warnings
ⓘ   Get help: https://github.com/conventional-changelog/commitlint/#what-is-commitlint
As we have seen we could also see warnings if it’s a minor improvement only as a missing full stop at the end of the commit message like this:
⧗   input: fix(tooling): Fix broken doc generation #1
⚠   subject must end with full stop [subject-full-stop]

⚠   found 0 problems, 1 warnings
ⓘ   Get help: https://github.com/conventional-changelog/commitlint/#what-is-commitlint
If the message is correct then the test will look like this:
⧗   fix(tooling): Fix broken doc generation.
    ref: #1
✔   found 0 problems, 0 warnings
With that we have made sure our commits always have reference ticket number.
Server side commits check
Commitlint can also be configured with CI server to ensure that all commits are linted correctly and never skipped with --no-verify argument.
An example configuration in GitLab CI would look as simple as this:
lint:commit:
  stage: lint
  script:
    - echo "${CI_COMMIT_MESSAGE}" | npx commitlint
Demo
If you like to watch a simplified demo of this content, check out this video:
The source code for that demo can be found here.
Summary
Git hooks are scripts that can automatically be integrated in the Git workflow to run certain checks and tests. They are very helpful for enforcing development best practices. One of my favorite is keeping a reference ticket number in every commit message to make it easier to track and understand.
Other more advanced commits conventions exist and a couple of tools can help you set them up into your workflow within a couple of minutes as we have seen for a Node.js project. This unifies the way team members work and helps reduce code ambiguity and human errors.
All of that saves precious developers’ time that they can use thinking of and building great features they enjoy instead of worrying about finding a certain convention or writing release notes manually.
Thank you for reading!